
My first try at baking macarons was a success! Since then, I've baked dozens of macarons, and each bite is heaven. . . Thank you Kak Yeen. (Amy's cousin). If you're in Kuantan, please visit her blog and order cakes from her. I heard they are scrumptious!
I have heard that making Macarons are not easy. First timers often complained that their Macarons came out flat, cracked, or unable to form their feet. I decided to put my 'baking skills' to test and since I am a perfectionist and also do not want to waste sugar and expensive almond meal on fail attempts, I did various research from the internet and reading books about Macarons prior to baking my first batch.

I read about Pierre Hermé's Macarons in Paris, and bought some Macarons in Empire, Subang Jaya, but I have to say, that those store bought Macarons are too overpriced, too sweet and overcooked, some are too crunchy and taste like meringue, unlike what Macarons are supposed to taste like which is crisp on the outside, and tender on the inside. Hmm taking about Macarons makes my mouth waters!!
Well, since I can't afford a vacation to Paris at the moment, let us all imagine we're sitting at the cafe in Paris sipping espresso and eating Macarons, shall we? . . . first by making our own Macarons.

Now the secret of baking a perfect batch of Macarons is patience. Go Slow! and never change the balance of the recipe. You may want to put less sugar, but believe me you don't want to do that. To balance the sweetness of Macarons, I will drink with sugarless coffee or espresso, milk, and I will ice my Macarons with sour or bitter fillings.

Macarons: Basic Recipe
These ingredients will make the cookies. Although the ingredients are simple, some say the technique is the hardest to master. Try to bake a couple of batches of simple other macaron flavors (just use coloring and fruit preserves for a start) before getting ambitious to try out other more challenging macaron flavors.
- 150gm icing sugar mix with 150gm ground almond / almond meal.
- 3 egg whites (from 3 large eggs), separated for at least 24 hours in advance and kept in the refrigerator (best to keep 2 days in advance for best macarons)
- 1/2 cup castor sugar
- A pinch of ceam of tartar
- Food coloring
Tools:
To successfully make your macarons, you need to invest on these kitchen tools. If you like to bake, you may already have these tools, but if you're a novice at baking, these tools will also help you to make other great eats.
To successfully make your macarons, you need to invest on these kitchen tools. If you like to bake, you may already have these tools, but if you're a novice at baking, these tools will also help you to make other great eats.
- Kitchen scale (digital, if your budget permits, it’s more precise, else, just use the traditional scale like me. . .)
- Food processor (to blend in that almond meal and icing sugar)
- Hand or stand mixer with whisk accessory (mandatory!!, Don't have? Go buy or borrow one)
- Measuring cup (to measure the sugar)
- Sifter or fine sieve
- Big stainless steel bowl
- Another big mixing bowl
- Spatula
- Pastry bag and round tip (1/2 to 3/4 inch opening, I like to use pastry plastic bags)
- Large baking sheets, preferably 2 to 4 of them
- Parchment paper
- Various food color (liquid, gel or powder are all good)
A few days before making your macarons: Prepare your eggs.This is a very crucial process. Separate them, putting the whites in a clean airtight container and reserving the yolks for another use (cream puffs perhaps?). Most Recipe said to "age your white eggs" for at least 24 hours, but trust me, you must leave them to relax on your fridge counter for at least 2 days. You may keep your egg whites up to 5 days in the refrigerator before you use them. If you have kept the egg whites more then 5 days, discard them, or use for other purpose such as coating chicken for frying.
Measure the powdered sugar and ground almond and put them in your food processor/ blender. Finely grind the two together for a minute or two. Stop the processor, scrape the sides and bottom of the bowl, and process again for a minute.
(Huh? I need to grind my ground almond again? . . you may think). Yes! this is yet another crucial step for perfect and happy Macarons. You must grind your almond, and icing sugar again so as to marry well between the icing sugar and the ground almond. This process will also get rid of those almond bits that may remain in the packaging.
You may grind your own almonds, just make sure they are peeled. It is sometimes hard to find ground almonds where I am living so sometimes I just buy almond flakes or almond bits then I finely grind them (Be sure to: add the powdered sugar to the almonds when they are coarsely ground to make sure you don’t end up with a paste!).
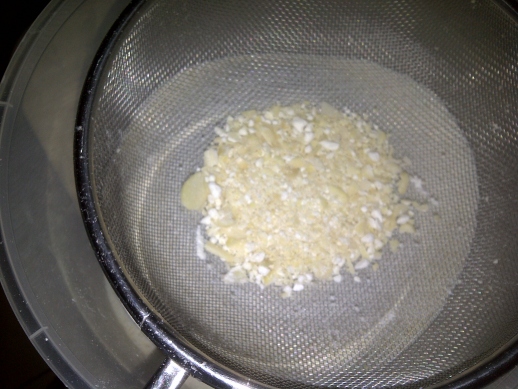
After processing the powdered sugar and ground almond, you have to sift the mixture. This is really important as it will get rid of the remaining bigger bits and ensure a smooth batter. Don’t try to force the remaining bits of the almonds into your sifter. It is ok to discard (may use as sprinkles on your cereal the next morning). The quantity shouldn’t be significant enough to distort your recipe.
Here’s what I generally have left after I sieve half of my almonds-sugar mixture:
Making the Macarons:
The the day (or night) you plan to make your macarons: Take your egg whites out of the refrigerator and leave them to temper at room temperature for several hours. (Note: this is also an important process, Do not try to rush, the Macaron baking process. the result of beating cold white eggs, will cause your Macarons to crack when you take them out of the oven, later, don't ask me why, just is, cause one time I rushed and thought hell, am just going to beat these white eggs now . . . Not a smart move.)
Next, take your bigger stainless steel bowl, you Must use a stainless steel bowl to beat your eggs. Stainless steel bowls helps egg whites get fluffy and firm. Make sure your bowl is cold (Stainless steel bowls are usually cold by itself, but if not, you can rinse the bottom of the bowl with cold water, or stick it in the fridge for 10 minutes). Why cold bowl? Cold bowl will make both egg whites and yourself happy, when the egg whites are fluffy and stiff after beating. If you don't have a proper stainless steel bowl used for baking, then you can use your rice cooker pot or them Asian style pot called 'periuk', these are also stainless steel.
Then, measure your granulated sugar. Put your egg whites into your stainless steel bowl and start to beat them, start with slow, then gradually increase speed to medium then high. Then add cream of tartar once the egg whites get bubbly and your whisk is leaving white marks. Slowly add 1 tablespoon of granulated sugar first. Continue beating and add the remaining sugar slowly, over the next few minutes or two. You must continue beating until your egg whites are stiff. How to know when they are stiff? When peaks form and remain up when you take out your whisk. (FYI: you must stop your mixer before trying this ya?). Then when your eggs are ready, their color will be translucent white, creamy, dense and not bubbly or watery. Like the picture below:
Then, measure your granulated sugar. Put your egg whites into your stainless steel bowl and start to beat them, start with slow, then gradually increase speed to medium then high. Then add cream of tartar once the egg whites get bubbly and your whisk is leaving white marks. Slowly add 1 tablespoon of granulated sugar first. Continue beating and add the remaining sugar slowly, over the next few minutes or two. You must continue beating until your egg whites are stiff. How to know when they are stiff? When peaks form and remain up when you take out your whisk. (FYI: you must stop your mixer before trying this ya?). Then when your eggs are ready, their color will be translucent white, creamy, dense and not bubbly or watery. Like the picture below:

Okay, now your egg whites are ready to be colored. For this sample step-by-step instruction, I use the color pink for my strawberry cream macarons. I added about 10 drops of the gel coloring (more if you like intense color but not too much, else your batter will be bitter! 15 drops top!). Remember YOUR EGGS WHITES ARE DELICATE AND YOU MUST TREAT THEM GENTLY. Gently fold in the color using a spatula. How to fold? Slide your spatula on one side under the egg whites and bring bottom to top, gently and in small heaps. You must practice patience in this process as if you are too fast, or whisk the egg whites at this point, you will deflate egg whites and your batter will be ruined.
Once you've added the granulated sugar and the coloring, the batter will be matte, light and fluffy as picture:


Prepare your baking tray. Use your regular cookie tray. Put the parchment paper on top of the tray. Pre-measure and cut the parchment paper earlier.
Next, fill in your pastry bag or plastic bag with its tip. I like to use plastic pastry bags. BTW, you can also reuse the plastic pastry bags (2 to 3 times, why waste huh?, well, if you're not up to washing . . . you can just throw em too)
To make transfer to bowl easy I stand the pastry bag in a cup. You must fold and twist the tip to be sure the batter does not comes out from below while you are filling it. (I usually stick a kitchen towel below). Fold long pastry bags to be sure the batter get into the bottom of the bag.

Take your bag out of the cup, keeping the tip folded or twisted so that the batter doesn’t come out. Unfold the larger end of the bag and twist it shut close to the batter to push it down. As you lay your macarons on the cooking sheets, you will continue this motion (twisting the larger end of the bag with one hand) to put constant pressure on the batter and ease its way out on the sheets. I make the macaron disks size about a 50 cents coin or 1.5", or the size of the cap of your pepsi bottle. (You don't want to make em too large, as these indulgences are best consumed a little at a time, to ensure maximum pleasure)
When the Macarons are first piped out of the pastry bag, they will look like they have a tip on top ( remember Hershey's kisses?), these will gradually flat out, when you let them rest at room tempreture for at least 20 minutes before baking. Banging the tray bit by bit will also help to smooth out the Macarons. If you want total perfection, you may let your Macarons rest for as long as 2 hours. But hell, I often don't have 2 hours to spare, so I will usually go for 20-60 minutes. You must let them rest as this will help to 'dry' the caps, and make the shell hardened, and help them to plump up nicely as they cook.
I bake them for about 10-15mins. Usually first batch is 15 mins, then the 2nd and third batch, you may want to wait 10 mins (time bake reduces as the oven gets hotter the longer is is left ON. So please check ofter as you bake. FYI, avoid opening your oven door the FIRST 10 mins. Overooking the macarons will make them too crunchy (like meringue), Undercooking them will make them seperate or break when you try to remove them off the sheets. (Believe me it gets easier the more you practice!). Now remember: Excessive heat is macarons worst enemy: I had my lemon macarons coming out all brown once, and became super crunchy.
Once done, take the sheets out of the oven and let the cool on a rack. By 10 mins, they should be at room temperature. Once cooled I usually will use a bread knive or an icing stainless steel spatula to gently wedge the macarons from the baking sheets. Another test of patience here, as they may sometime stick to the parchment paper, and you need to do this gently, else you may break your precious macarons. A perfectly baked macaron will have a flat bottom (what the expert calls "its feet") and a beautiful crown (YAY!!). 
Assembling your macarons:
To make transfer to bowl easy I stand the pastry bag in a cup. You must fold and twist the tip to be sure the batter does not comes out from below while you are filling it. (I usually stick a kitchen towel below). Fold long pastry bags to be sure the batter get into the bottom of the bag.
How, twist the end of your pastry bag, take it out of the cup. Remove the kitchen towel used as a cork at the tip.To push the batter out nicely, put pressure on the end of your pastry bag.
Now this is the best part of making the Macarons which I love. I call it play time. Like an artist holding her brush, hold the tip of your pastry bag to guide it, and hold the larger end of the bag, twist it shut to the batter to push it down. You will continue with this motion, as you lay your macarons on the baking tray. This process is also sometimes called as piping out. You may need to have a few practices. Don't worry, if you don't have artistic hands, your macarons may not come out round, and uniform in size, but with practice, any mastery is possible.

Take your bag out of the cup, keeping the tip folded or twisted so that the batter doesn’t come out. Unfold the larger end of the bag and twist it shut close to the batter to push it down. As you lay your macarons on the cooking sheets, you will continue this motion (twisting the larger end of the bag with one hand) to put constant pressure on the batter and ease its way out on the sheets. I make the macaron disks size about a 50 cents coin or 1.5", or the size of the cap of your pepsi bottle. (You don't want to make em too large, as these indulgences are best consumed a little at a time, to ensure maximum pleasure)

When the Macarons are first piped out of the pastry bag, they will look like they have a tip on top ( remember Hershey's kisses?), these will gradually flat out, when you let them rest at room tempreture for at least 20 minutes before baking. Banging the tray bit by bit will also help to smooth out the Macarons. If you want total perfection, you may let your Macarons rest for as long as 2 hours. But hell, I often don't have 2 hours to spare, so I will usually go for 20-60 minutes. You must let them rest as this will help to 'dry' the caps, and make the shell hardened, and help them to plump up nicely as they cook.
While you let your Macarons rest, it is a good time to pre-heat your oven. Preheat between 135-150 Celsius (275-300F). However, bear in mind each oven may have each own personality, mine does. So if this temp is too hot for your oven bake a small batch first, If they brown too fast, means that the tempreture is too hot. Your macarons should not come out too brown. You may want to play safe by baking them at a lower temperature and leave them longer in the oven. For your first trial, stay close to your oven!
I bake them for about 10-15mins. Usually first batch is 15 mins, then the 2nd and third batch, you may want to wait 10 mins (time bake reduces as the oven gets hotter the longer is is left ON. So please check ofter as you bake. FYI, avoid opening your oven door the FIRST 10 mins. Overooking the macarons will make them too crunchy (like meringue), Undercooking them will make them seperate or break when you try to remove them off the sheets. (Believe me it gets easier the more you practice!). Now remember: Excessive heat is macarons worst enemy: I had my lemon macarons coming out all brown once, and became super crunchy.

Once done, take the sheets out of the oven and let the cool on a rack. By 10 mins, they should be at room temperature. Once cooled I usually will use a bread knive or an icing stainless steel spatula to gently wedge the macarons from the baking sheets. Another test of patience here, as they may sometime stick to the parchment paper, and you need to do this gently, else you may break your precious macarons. A perfectly baked macaron will have a flat bottom (what the expert calls "its feet") and a beautiful crown (YAY!!).

Assembling your macarons:
Once cooled, they are ready to be assembled! (Best part!!) Match the caps that looks well together. For Filling, use your imagination and budget. I like anything mixed with cream cheese, sop I usually make lemon cream cheese curd, or strawberry cheese, blueberry cheese or use Italian buttercream frosting is also good. Double choc is also good or just use nutella (although I find using nutella is too sweet). Since macarons shell is very sweet, I usually like to make the filling sourly, so up to your taste, really.
Now just as you would prepare a sandwich, use the icing spatula and gently press to stick them together.
To store your macarons, put them in an airtight container, in the fridge and let them rest for at least 24 hours. Letting these macarons rest with their icing will really reveal the soft and tender texture of the macarons. The humidity of the icing will keep the caps crispy yet tender on the inside. Biting into a perfectly baked and aged macaron is heaven!!
Best to eat for the next 4-5 days (don't think it will last that long if you have cookie monsters living with you though!)
Best to eat for the next 4-5 days (don't think it will last that long if you have cookie monsters living with you though!)

Some says baking macarons is difficult, I say, until you try, nothing is impossible!
Too lazy to make your own? You may order from me. Just email me at
mentegakej